
How we built a bioreactor on top of the Raspberry Pi

The Raspberry Pi is a low-cost, single-board computer that has exploded in both at-home use and in industry. What makes the Raspberry Pi so useful is that it can run Linux, connect to the internet, and has lots of input/outputs - making it very useful for being the "brain" of your system. Makers have put the Raspberry Pi at the center of robots, LED displays, home-automation systems, and more. And in industry, they are being adopted to run subsystems of factories, research tools, and be deployed IoT devices.
Here at Pioreactor, we are building our bioreactor system on top of the Raspberry Pi computer. If you've never used a Raspberry Pi, don't feel intimidated. We designed the Pioreactor so that using it is simple enough that our you don't need to be a software developer, statistician, electrical engineer, or biologist - just curious!
Don't have time to read the entire article? Here's a quick snapshot of what we're talking about:
- The core logic of the Pioreactor is bundled into Python scripts, and the hosted Node web server executes these scripts.
- Pioreactor uses MQTT and SQLite to build data pipelines and store data longterm, respectively.
- We consolidated all the necessary chips and drivers onto a single Raspberry Pi HAT
The brains of the Pioreactor
The bioreactor behaviour is controlled by Python scripts. Okay, smart Python scripts, but still just Python scripts. Later we will see how these scripts can pass messages and events to each other. So why did we choose Python? Mainly because it's the language we are most familiar with. That being said, it's a language many developers are familiar with, which encourages more developers to contribute to Pioreactor directly or through our plugin system. We also like how Python has terrific libraries for data processing, analytics, and working with the Raspberry Pi. We are also happy with the performance of Python - our scripts are pretty light on compute and memory. In fact, we have lots of additional compute and memory available, even when running on a Raspberry Pi Zero.
If you run scripts often, you'll find you want a shortcut. That's why we developed a command line interface (CLI) on top of our scripts. This CLI is the main entry point for working with the Pioreactor (see our documentation on the CLI). Most users won't use the CLI but instead will use our web interface. The CLI was developed for developers, or power users, as a consistent entry point for controlling the Pioreactor.
Data storage
As data engineers, we have a strong opinion on how data should be handled. We picture Pioreactor's data as streams, and we needed to build pipelines to move the data to different sinks. Some of those sinks might be long-term storage, some sinks might be real-time analytics systems that produce their own streams of data. Data could be numbers, like an optical density reading, but it could also be events. These events might trigger further downstream events.
We also wanted to display historical data in the UI, which meant we needed a storage system with all historical data and could be read quickly. Settling on a simple data architecture, the two core pieces of technology are SQLite and MQTT.
SQLite is our long-term data storage option. It is a very reputable, lightweight, and a boring database. Perfect for us because boring is good. SQLite has a long history of working well with Raspberry Pis too, so there's a rich ecosystem of tools and support.
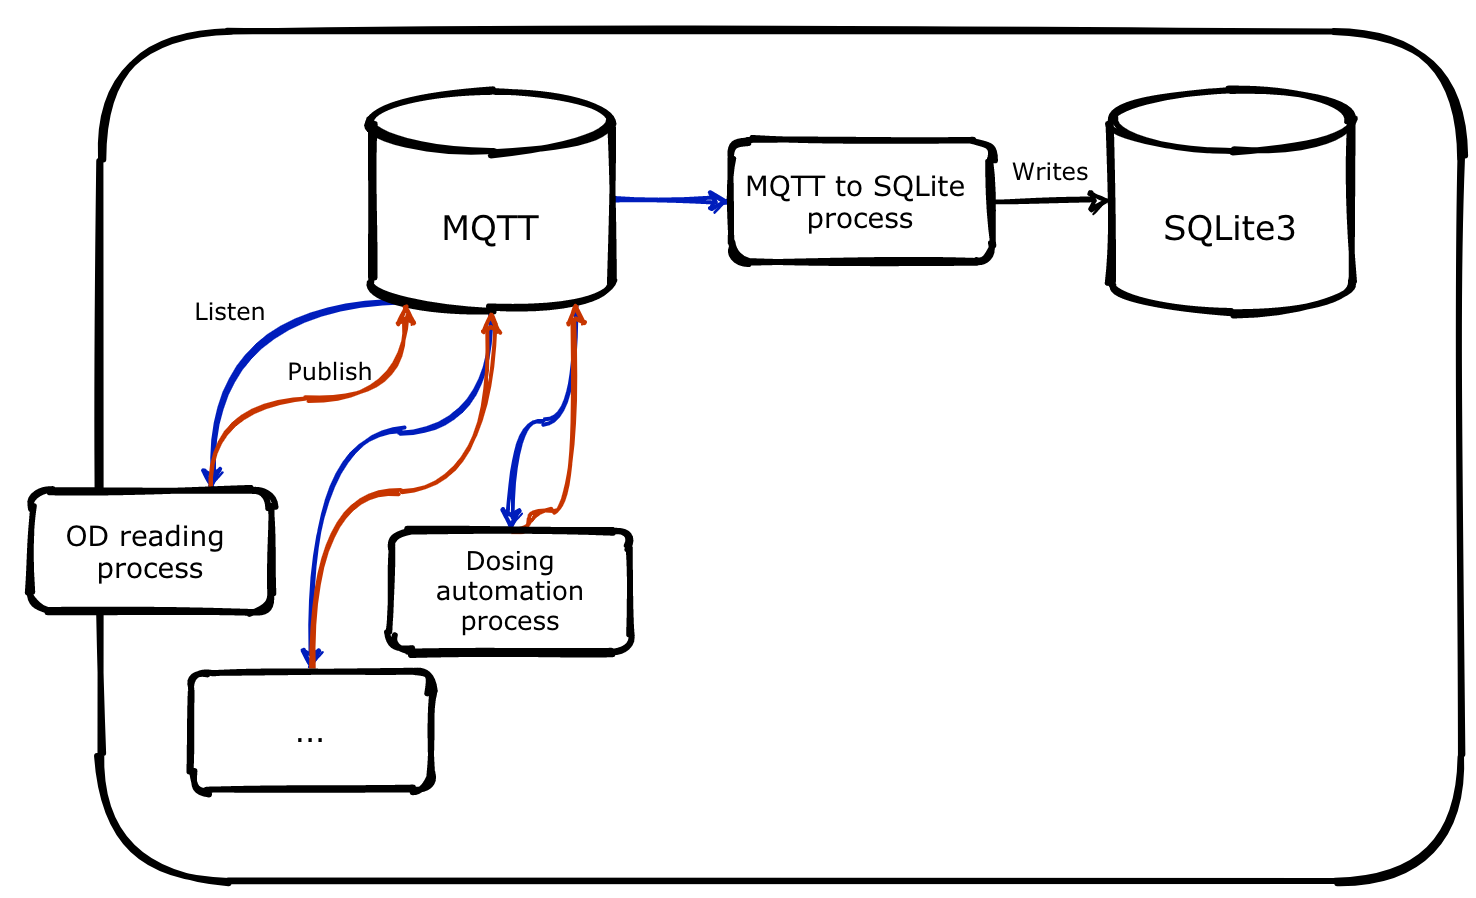
Many people haven't heard of MQTT, so I want to spend some time describing what it is and why it's useful. MQTT is our real-time component that defines most of our data pipelines. It does this by being a "broker" of data points. It will accept new data points (or events) from any sub-system and pass on these data points to any sub-system who want them, all with very low latency. For example, a Python process that reads the optical density measurement will publish data to MQTT, and MQTT will send those measurements to other Python processes that are subscribed to the latest optical density measurement. This turns the system into a reactive program - able to respond to changes in other sub-subsystems instantly. Another use case is how we add data to the SQLite database. Processes will publish data to MQTT, and a dedicated MQTT-to-SQL process will subscribe to all these data streams and write to SQLite as the data comes in. Below is a diagram of the relationship between MQTT, processes, and SQLite:
The Pioreactor web interface
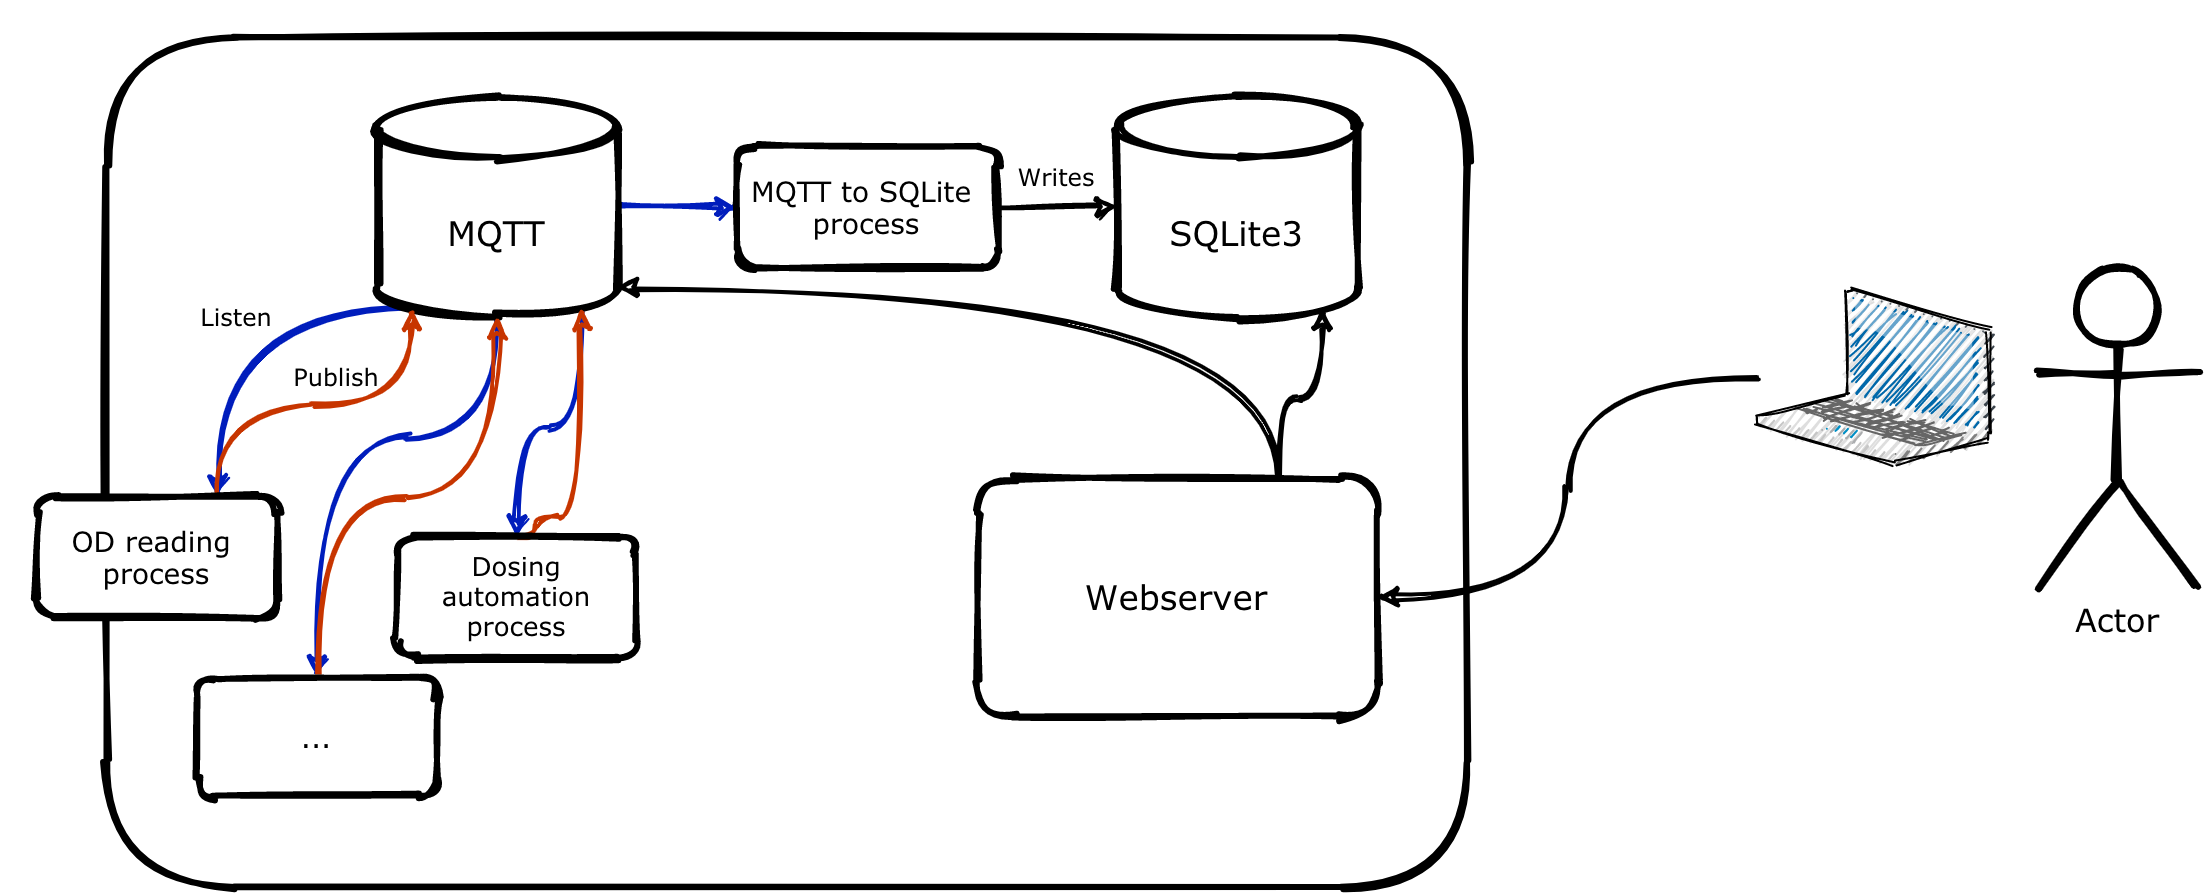
On each leader (learn more about roles), Pioreactor has a Node.js web server (source code for web server here). That web server is only available on the local network and is accessible at pioreactor.local from any other devices on the same network. The web server serves our React app, which connects to the MQTT broker to provide real-time data to the website, and connects to the SQLite database to provide historical data (charts, logs, and summary statistics). This goes the other way, too. Actions in the UI send commands back to MQTT or the CLI, which start or modify the bioreactor's behaviour.
Running external motors from the Pioreactor HAT
A Pioreactor can control up to four motors: one is dedicated to stirring, and three other for peripherals (peristaltic pumps, air pumps, a robot if you desire...). An option we could have taken, early in the Pioreactor development, is to use inexpensive microcontrollers to control subcomponents. For example, using the Raspberry Pi to send commends to a dedicated Arduino, and the Arduino controls stirring. This provides a nice separation of concerns: the Arduino can efficiently execute running a motor, and the Raspberry Pi only needs to send commands and doesn't care about how the stirring happens. This separation of concerns is analogous to what we call "microservices" in software engineering. Another benefit is by delegating control to microcontrollers, they are able to use external power that isn't available to the Raspberry Pi (recall the Raspberry Pi's power rail is limited to 5V and ~1.5 amps).
Unfortunately, delegation to subsystems adds complexity to the overall system, for both users and developers. For users, they now have to deal with additional hardware components, connections, and more hence more surface area of failure. Costs also increase with more subsystems. For developers, the codebase would be split further. An unexpected stirring behaviour might be due to faulty code on the microcontroller, or in the command sent, or in the Raspberry Pi code - all in different programming languages, too.
For this reason, we decided to keep things tightly coupled to the Raspberry Pi. The Raspberry Pi controls the pulse-width-modulation (PWM), via some MOSFETs, and we take advantage of the hardware PWM pins built into the Raspberry Pi for this. Sensors, like optical density and temperature, talk directly to the Raspberry Pi via I²C. All this means we can operate from a single codebase, with reduced hardware, and less surface area.
Any power constraints on the Raspberry Pi is solved by our HAT providing an auxiliary power input:

LEDs
Like our motor system, we had a similar choice to make for our LEDs and our photodiodes. Do we want to use a microcontroller, or can we have the Raspberry Pi handle this? Using a LED driver allows us to delegate the state and brightness of the LED to a dedicated chip. The Raspberry Pi only needs to send state over I²C to the chip. And by capping each LED's current draw to a maximum of 50mA, we can safely tap into the Raspberry Pi's power rail.
The rest of our input-outputs
The Raspberry Pi comes with 40 GPIO (general purpose input-output) pins, some with special functions. For example, two of the GPIO pins are assigned to be a I²C channel. This is incredibly useful for transferring data between Python and chips (our temperature sensor, LED driver, and ADCs use this channel). We also use the GPIO's PWM functionality to varying the speed of off-board motors (for example, how stirring RPM is controlled). Other uses of the GPIO pins include:
- Turning the HAT's LED on.
- Detecting when the identify button is pushed.
- Detecting the RPM of the magnetic stirrer.
We've purposely exposed the 40 GPIO pins on our hat so that users can add their own hardware to the Pioreactor. For example, suppose you have a digital pH meter that you want to integrate. This can be plugged into the I²C pins, and a Pioreactor plugin can be built to read and record the data.
Conclusion
There's lots more to say about how we built the Pioreactor on a Raspberry Pi. I haven't talked about the HAT specifications (or what that even means), EEPROM, the Linux utilities we are taking advantage of, or the installation process. Maybe we'll need to write a Part II to this! Stay tuned!